Build this Alarm System yourself using cheap off-the-shelf components. The Siren will sound only once. It will not re-trigger. The alarm's modular construction allows you to add as many zones as you like to your system.
This range of Expansion Modules will allow you to add any number of Alarm Zones, Personal Attack Zones and Tamper Zones to your system. There's also an Untimed Output Module. It gives you the option to keep an internal sounder, strobe light, lamp or whatever going - after the siren has stopped.
Simple Extra Zones
How To Connect This Module To The Main Alarm Board
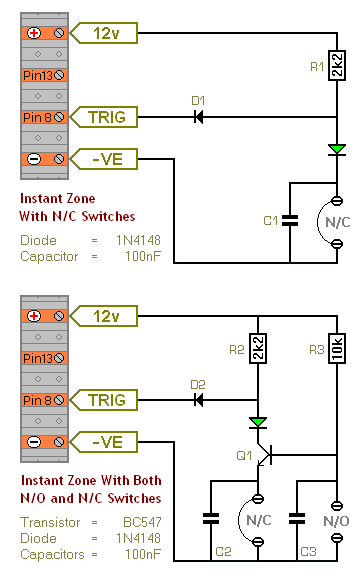
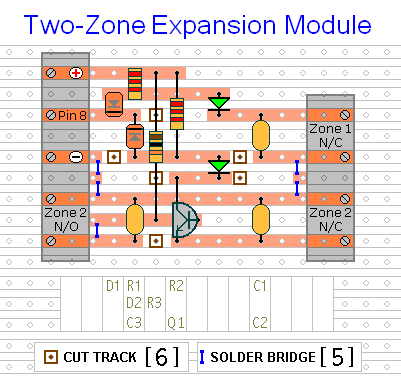
The first two circuits are the simplest. One is designed to be used with the usual types of normally-closed input devices such as - magnetic-reed contacts - micro switches - foil tape - and PIRs. The second circuit has an additional normally-open trigger for use with devices such as pressure mats. The accompanying stripboard layout includes one example of each type of circuit. You can connect as many of these two-zone modules as you like to your system.
Latching Zones
How To Connect This Module To The Main Alarm Board
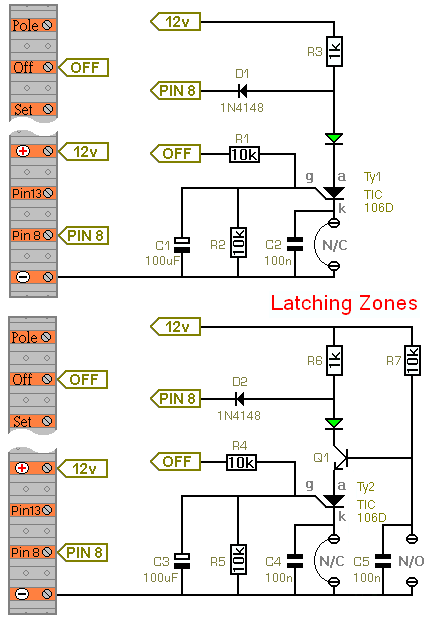
Every alarm installation gives problems - sooner or later. They are usually intermittent - and caused by faulty connections, switches or sensors. One of the main reasons for dividing your installation into zones - is to make fault finding easier. But this purpose is defeated if you don't know which zone is causing the activations. The next two circuits have a "memory" feature. When the zone activates - the Green LED switches off - and stays off.
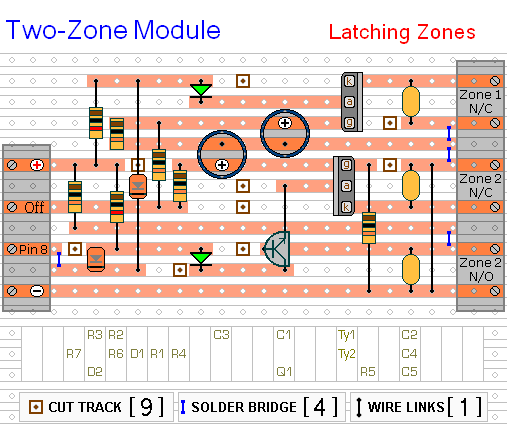
The first circuit is designed to be used with the usual types of normally-closed input devices such as - magnetic-reed contacts - micro switches - foil tape - and PIRs. The second circuit has an additional normally-open trigger for use with devices such as pressure mats. The accompanying stripboard layout includes one example of each type of circuit. You can connect as many of these two-zone modules as you like to your system.
The positions of the kathode, anode and gate connections are marked on the stripboard layout. Note that the two SCR are facing in opposite directions. I used the TIC106D in the prototype because it's widely available. Obviously - at 5-amps and 400v - it's far more SCR than you actually need. You'll probably find that any SCR - 30-volts or better - will work fine. But remember that the pin configuration of your SCR may be different from that of the TIC106D.
Personal Attack / Tamper Module
How To Connect This Module To The Main Alarm Board
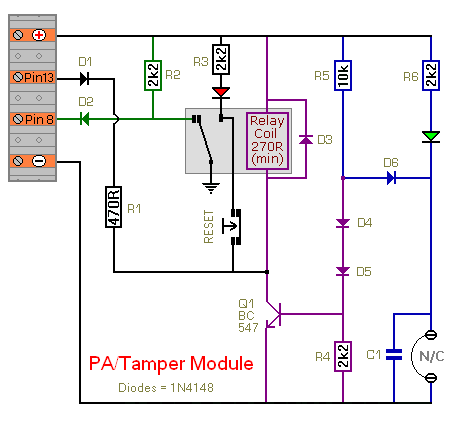
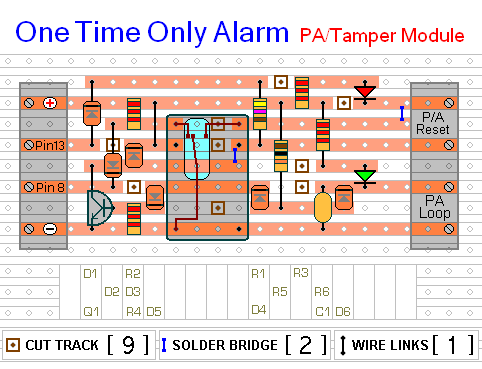
Personal Attack and Tamper zones have to work 24-hours a day - even when the alarm is switched off. When the zone is activated it takes pin 13 rapidly low - through D1 and R1. This both switches the alarm on - and bypasses the exit delay. R2 takes pin 8 high - through D2 - and activates the Siren.
The Siren will sound for the preset length of time - and then switch off. The Red LED will tell you which zone has been activated. To reset the zone - first restore the loop - then press the reset button. You can connect as many PA/Tamper zones as you like to your system.
Untimed Output Module
How To Connect This Module To The Main Alarm Board
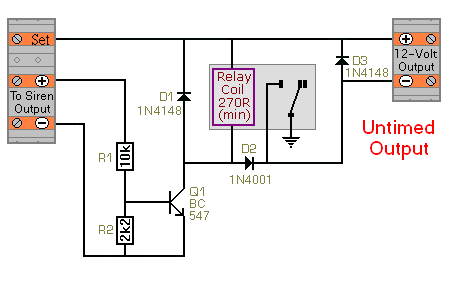
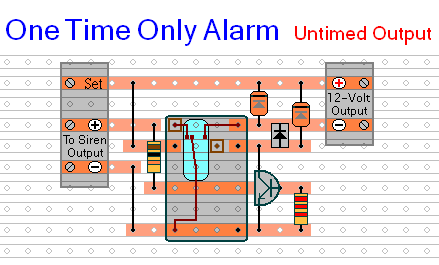
After the siren output switches off - this module will continue to supply power to other devices. You may want to use it to power a strobe light or an internal siren. If you connect a suitable relay to the module's output terminals - you can use the relay contacts to control anything you like - such as internal or external lighting.
 SUGGESTIONS
 SUGGESTIONS
