The prototype of the Modular Burglar Alarm was built using only the Stripboard Layout as a guide. So - if you have faithfully reproduced that layout - you will have a working circuit.
Once you're satisfied that your layout is correct - and you have made a careful and thorough check of the underside of the board - it's time to power-up the circuit and test its operation. This is always an anxious moment. If you construct a lot of circuits - you might consider building the
Current Limiting Power Supply - or alternatively - you could add the
Simple Current Limiter to your existing PSU. Both will let you set an upper limit on the amount of current supplied to your circuit - and so protect it from any serious damage.
In what follows, it's important not to take the statements - about the length of any time period - too literally. The length of any delay will depend on the characteristics of the actual components you've used. I've only given rough approximations.
Setup
There's no need to connect-up the Bell, Buzzer, Magnetic-Reed Contacts etc. in order to test your circuit board. You can simulate the trigger-switches using short lengths of flexible multi-stranded wire - such as alarm cable. Don't use single stranded wire. It's awkward to handle - and doesn't take well to being twisted and untwisted. A couple of resistors and LEDs will serve as Buzzer and Bell.
Connect the short lengths of wire to the inputs. Strip the insulation from the ends of the wires and twist them together to simulate the Exit/Entry Loop - The PA Loop - The PA Reset Button - and The Instant Loop. Note that the two wires connected to the Instant Zone normally-open input are not twisted together.
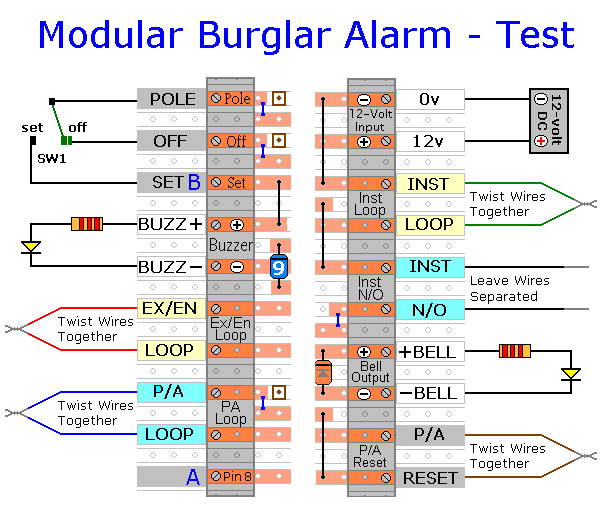
To simulate the Buzzer and the Bell, connect an LED - in series with a 2k2 resistor - to both outputs. This will be sufficient to demonstrate that the outputs are working. I used yellow LEDs in the diagram because - in what follows - I wanted to be able to distinguish between them and the other LEDs in the circuit. You can use whatever colour you have available.
Next, connect the on/off switch - SW1. Pay particular attention to the position of the "Pole". It doesn't matter which way round the other two connections are made. Move the switch to the "Off" position - and leave it there.
If you haven't already done so - position all three variable resistors at about mid-point. You can set the actual times you require later. At the moment we are only interested in testing the circuit board.
Finally, connect the 12-volts DC to the input terminals. Pay particular attention to the polarity of the supply. Note that the negative connection goes to the top terminal.
Turn On The Power
At this stage the two green LEDs should be lighting and the red LED should be off. Begin by testing the Exit/Entry and Instant Zone trigger circuits.
Untwist the red wires connected to the Exit/Entry input. Then touch them together a few times - to open and close the loop. As you do so - the green Exit/Entry LED should turn off and on. When you're satisfied that it's working properly - twist the red wires back together - and move on to the Instant Zone.
Begin with the normally-open input. Touch the ends of the two black wires together a few times. As you do so - the green Instant Zone LED should turn off and on. When you're satisfied that it's working properly - separate the two black wires from one another - and move on to the normally-closed input.
Separate the two green wires. Then touch them together a few times - to open and close the loop. As you do so - the green Instant Zone LED should turn off and on. When you're satisfied that it's working properly - twist the two wires back together - and turn your attention to SW1.
Move the switch back and forth between the "Off" and "Set" positions. The Red LED should be lit when the switch is in the "Set" position - and it should be off when the switch is in the "Off" position. When you're satisfied that it's working properly - leave SW1 in the "Off" position - and prepare to test the Exit Delay.
During the Exit Delay we want the Buzzer to sound while the Exit/Entry loop is open - and to stop sounding when the loop is closed. Begin by untwisting the red wires - but keep the loop closed by holding the ends of the two wires together. The Green Exit/Entry LED should be lighting.
Next, move SW1 to the "Set" position and - during the first 10 seconds or so - open and close the Exit/Entry loop a few times. As you do so, the yellow LED connected to the Buzzer output should turn on and off.
The Exit Delay will last about 30 seconds or so. Close the loop and wait for the delay to expire. Then open and close the loop again. This time the yellow LED connected to the Buzzer output should turn on and stay on. In other words - closing the loop should no longer turn the Buzzer output off.
Next - turn the Buzzer output off by moving SW1 to the "Off" position. Twist the two red wires together - and go on to test the normally-open input of the Instant Zone.
Note that the Exit Delay also applies to the Instant Zone. Move SW1 to the "Set" position - wait for the delay to expire - and then touch the two black wires together. The yellow LED connected to the Bell output should light immediately - and it should remain lit when you separate the two black wires again. This means that the normally-open instant trigger has worked properly. Move SW1 to the "Off" position - and the yellow LED connected to the Bell output should turn off.
Use a similar approach to testing the normally-closed input of the Instant zone. Move SW1 to the "Set" position - wait for the Exit Delay to expire - and then open the green Instant loop. The Bell output should turn on immediately - and it should stay on - even after you have restored the loop. Move SW1 to the "Off" position - and the Bell output should turn off.
The next test is the Entry Delay. Move SW1 to the "Set" position and wait until the Exit Delay has expired. Then open the Exit/Entry loop. The yellow LED connected to the Buzzer output should light immediately. Close the loop again - and the LED should remain lit. If it doesn't - then the Exit Delay hasn't expired yet. Wait a while - and then open and close the red loop again.
About 30 seconds or so after the Buzzer output has latched - the Entry Delay should expire - the yellow LED connected to the Bell output should light - and remain lit. Move SW1 to the "Off" position - and both the Buzzer and Bell outputs should turn off. Twist the red wires together - and go on to test the PA/Tamper Alarm.
With SW1 in the "Off" position - open the blue PA/Tamper loop. The yellow LED connected to the Bell output should light immediately. It should stay lit even after you close the PA/Tamper loop again. Note that if you have left out R10 then - for test purposes - you may need to connect a 560 ohm resistor across the Bell output - otherwise the SCR may not latch properly.
To test the P/A Reset - first twist the two blue wires of the PA/Tamper loop together. Then separate the two brown wires connected to the P/A Reset terminals. The yellow LED connected to the Bell output should turn off immediately - and it should stay off when you twist the two brown Reset wires back together again.
One check remains - the Bell Cut-Off timer. Trigger the alarm using either of the zones - but not the PA/Tamper. With V3 set at mid-point - The yellow LED connected to the Bell output should turn off after about 20 minutes or so.
Note that when adjusting the various delays to suit your own particular requirements - you'll find that turning V1 and V2 to the right will reduce the Exit Delay and the Entry Delay respectively. Whereas, turning V3 to the left will reduce the Bell Cut-Off time.
Don't try to reduce the Bell Cut-Off time below about 5 minutes. For the circuit to work properly it's important that things happen in the right sequence. In particular, the Buzzer must cut-off before the Bell - otherwise there will be a short delay before the alarm is ready to re-trigger.
If You Find a Problem
If - in the course of the test - you find that something is not working properly - then a careful inspection of the relevant area of the circuit board should turn up the cause of the problem. If an LED is not lighting - check that it's connected the right way round. If the Exit/Entry zone is not triggering properly - check that the Zener diode is connected the right way round.
Where you've cut the board to size - look for small loose strands of copper left behind by the saw. Check the board for short-circuits caused by component leads touching each other. It can also happen that the stripboard itself is faulty. I have seen cases where the copper tracks have not been completely severed from one another during manufacture.
If you've built your circuit using the specified components - and you've followed the step-by-step construction guide described on the -
Support Page - then the chances are that any bug will be caused by something minor - a component connected the wrong way round - a missing or unwanted solder bridge - an incomplete cut in the track etc.
If you can't see anything obvious then adopt a systematic approach to faultfinding. Begin by double-checking that all of the cuts in the tracks have been made, that they are all -
In The Right Place - and that they sever the track completely. Use a magnifying glass. It only takes the smallest strand of copper to cause a problem.
When you're satisfied that the tracks have been severed in all the right places - check that you have made - and correctly placed - all 9 solder bridges. Check especially the bridge that connects pin 14 of the IC to the positive line. Mark each bridge with a felt-tip pen - or something similar - so that it can be easily identified later.
Next, carefully examine the full length of each track. Look for unwanted solder bridges. Your felt-tip markings will tell you which ones should be there - and help you identify any that shouldn't be there.
If all else fails and you still haven't found the cause of the problem - work your way through the assembly instructions on the
Support Page. Check each individual component and link - to make sure that it's present and correctly positioned.
Print out the drawings and mark off the components as you go. Pay particular attention to the orientation of the diodes, transistors and electrolytic capacitors. Make sure that Pin 1 of the IC is in the top left-hand corner - and that all of its pins are correctly inserted into the socket. Take your time and examine each individual component carefully.
 SUGGESTIONS
