How to make your own stripboard, perfboard, protoboard.
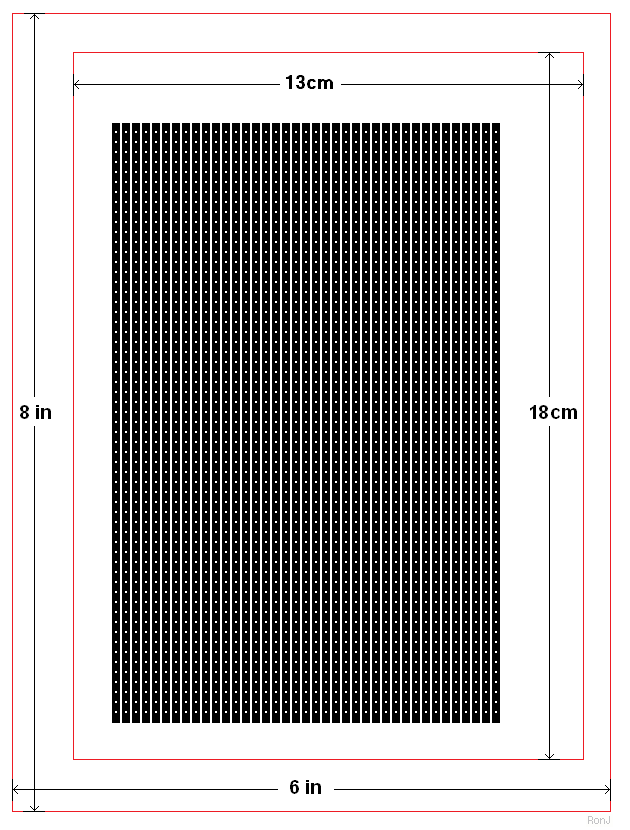
Stripboard has a matrix of small holes - spaced 0.1 inches (2.54 mm) apart. And - on one side of the board - the holes are joined together in rows - by narrow strips of copper. If you can make a printed circuit board - you can make a section of stripboard.
The template measures about 6 in x 4 in (15 cm x 10 cm). But you can make smaller pieces. Simply delete the unwanted parts of the pattern. Clearly - it's important that the print-out should be the right size. That's the purpose of the red boxes. They will confirm that your board has been printed at the correct resolution.
Begin by saving a copy of the template. Right click on the above image and select "Save Picture As..." from the context menu. Then save the PNG to your desktop. Next - check that the print size hasn't changed. Open the template with Paint - and select "Image" - then "Attributes". The Resolution should read "100 x 100 dots per inch".
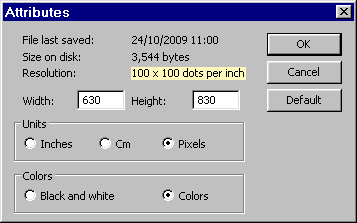
The template is a PNG. I chose this format because the file size is very small - under 4K. However - Paint is inclined to change the resolution of PNGs. So - if you intend to make alterations to the template - you should first convert it to a bitmap. This will preserve the 100 dpi resolution - during future manipulations.
Close the attributes screen. Then select "File" and "Save As". Change the "Save As Type" box to "24-bit Bitmap - and press the "Save" button. A new icon will appear on your Desktop. Close the current window (otherwise Paint is likely to crash) - and click on the new icon. This will open the new bitmap image. Then - just to make sure that the print resolution hasn't changed - check the attributes screen again. Before you do any work on your bitmap - make a master copy - and put it somewhere safe. That way - you'll have it for future projects.
Some Examples
How far you take the process - depends on the degree of refinement you want. Below - are four examples that will illustrate some of the possibilities. The board is for my Door Alarm circuit. I began by selecting a suitably sized piece of the pattern. Then I rotated it through 90 degrees. In the second drawing - I've severed the tracks in the 10 places required. In the third drawing - I've removed any unused portions of track. And in the final drawing - I've added the solder bridges - blanked out the unnecessary drill holes - and enlarged the solder pads for the terminals.
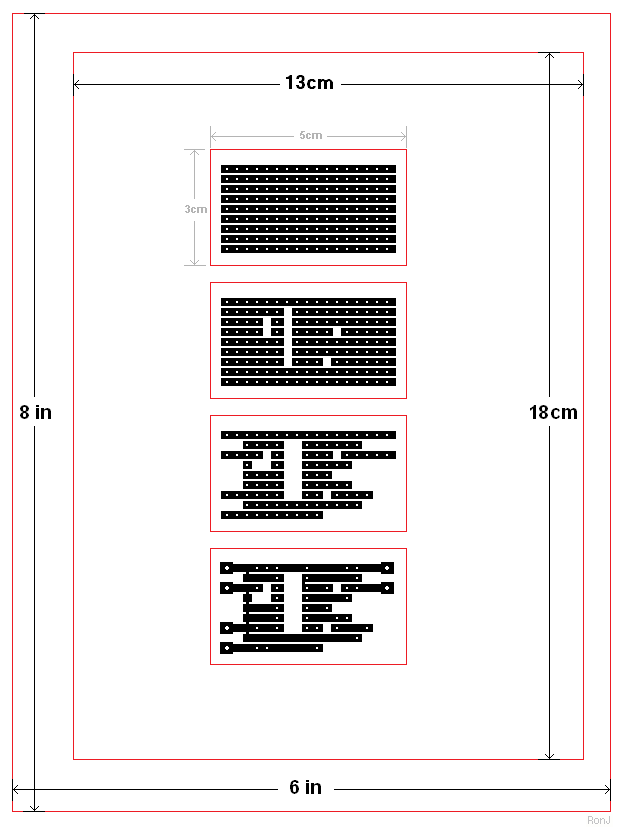
The above drawing illustrates just some of the possibilities. For a more complete guide to the conversion process - see How To Convert Stripboard Layouts To PCBs. Note that all the drawings show the board from above. That is - they represent the board when viewed from the component side. I found it easier to work from that side. However - this means that the final image MUST be flipped horizontally - before it's printed.
Always check the attributes - before you make your final print. If you've been working on a Bitmap - the resolution should still be 100 dpi. But if for some reason - you find that the resolution has changed - it can be restored to 100 dpi using the next drawing. Save the drawing - as you did the stripboard template - and check that it's 100dpi. Then "Copy" and "Paste" your final design into it. That should restore the correct resolution.

There are other techniques you can use to restore the correct print size. You can "scale" the drawing with your printer - or with suitable software. With the printer - you may have to select something like "Preferences" or "Advanced". There - you can set the percentage scaling. Make the percentage value - the same as the dpi of the drawing you want to print. For example - if the resolution of your drawing is 96 dpi - choose 96% scaling. If the resolution is 80 dpi - choose 80% scaling - and so on.
You can also restore the correct resolution with Gimp. There are versions for both Linux and Windows. And both downloads are free. Open your drawing with Gimp. Click on "Image" - then select "Scale Image". Change the X & Y resolution to 100. Then press the "Scale" button. And save your bitmap with its new resolution
 SUGGESTIONS
